Seasons lesson plan
Stand-alone lesson ESL kids lesson plan
Lesson plans for ESL kids teachers
Seasons
In this lesson students are introduced to vocabulary associated with different seasons. There is also a song to sing, a bingo game to play, a funny story to read and a great seasons clock craft activity to do.
Members get accompanying flashcards, worksheets, song and classroom reader.
Download materials:
Our lesson plans are FREE!
Sign up for accompanying:
✔ worksheets
✔ homework sheets
✔ craft sheets
✔ flashcards
✔ song downloads & videos
✔ classroom readers & videos
Click to see lesson details, materials and supplies
Time: 40 mins – 1 hour
Objectives: Talking about the four seasons.
Structures: “Let’s …”, “In the (season) …”.
Target vocabulary: spring, summer, autumn, winter, warm, hot, cool, cold, picnic, beach, walk, snow.
Lesson materials
Flashcards:
- spring, summer, autumn, winter
Printables:
- xxx
- Reader worksheet
- xxx song poster
Songs:
- Four seasons worksheet
- Reader worksheets
- The seasons song song poster
Readers:
- Four seasons or Silly Willy’s seasons
Additional materials:
- Seasons vocab crossword
- Seasons vocab word search
- Suzy’s wardrobe worksheet
Supplies:
- [hide_on_uk]colored[/hide_on_uk][hide_on_us]coloured[/hide_on_us] pencils
- lots of different [hide_on_uk]colored[/hide_on_uk][hide_on_us]coloured[/hide_on_us] paper cut into small squares
- marker pens
- 4 boxes
- prizes (e.g. [hide_on_uk]candies[/hide_on_uk][hide_on_us]sweets[/hide_on_us] or stickers)
- white card or construction paper cut into large circles (1 per group of 3 or 4 students)
- [hide_on_uk]colored[/hide_on_uk][hide_on_us]coloured[/hide_on_us] paper or card: reds, pinks, blues, greens, dark reds, oranges and browns
- scissors
- glue
- sand or yellow glitter
- cotton wool / cotton balls
- Blu-Tack or tape to stick season clock crafts to the wall
- board with marker / chalk
- device to play the song on
This lesson really helps students to learn the seasons of the year and words associated with each season.
Lesson procedure:
Warm up and maintenance:
The beginning of your lesson is extremely important: this is where you set the tone of your lesson and get everyone in the right frame of mind for learning English. It is also an opportunity to check homework and review previous lessons.
Click for warm up suggestions for the start of your lessons
These activities can be done in the following order at the start of your lesson:
1. Greetings and name tags
Greet the students by name as they enter the classroom and gesture for them to sit down. Before class prepare some blank name tags (stickers or pin-on tags). Give these out and have everyone write their names and put their tags on. If you use pin-on tags, you can keep and give out every class.
2. Homework check
Check each student’s homework set in the last lesson. Ask each student some questions about their homework worksheet (e.g. “what [hide_on_uk]color[/hide_on_uk][hide_on_us]colour[/hide_on_us] is it?”), give lots of praise, and then put some kind of mark on the homework sheet (e.g. a sticker, a stamp or draw a smiley face). Finally, tell your students to put their homework back into their bags.
3. Review past lessons
Reviewing past lessons is very important – students need constant practice of new vocab, structures, songs, games and so on. Always review parts of your last lesson as well as some parts from other previous lessons. You can spend 5-10 minutes reviewing – it’s fine to recycle games and activities from your past lessons to review as kids enjoy playing familiar games (although be careful not to play a game to death!). See the section “Other ideas to include in your warm” below for ideas.
You can also include review activities in the main body of your lesson. Kids can have short attention spans so it’s good to be able to pull out lots of activities during different stages of the lesson.
Other ideas to include in your warm up:
Ball pass questions
This is good to review questions from previous lessons. Get everybody standing in a circle.
Round 1:
Take a ball and hold it and say, “My name is (you name)”. Then throw the ball to one student and say, “What’s your name?”. Students throw the ball around randomly, saying their names and asking for names.
Round 2:
This time ask a review question, e.g. “How many tables are there?”. Then throw the ball to a student who should answer, “There are (6) tables”. Help if necessary. Then that student throws the ball to another student and asks a “How many …?” question. Continue so everyone has a go. You can have multiple rounds with different topic questions.

Play “Spin the bottle”
Sit students in a circle with a bottle in the middle. Teacher spins the bottle. When it stops spinning the student it is pointing to has to answer a question. If the answer is correct then that student can spin the bottle. This is a good class warm up activity (e.g. How are you? What’s your [hide_on_uk]favorite[/hide_on_uk][hide_on_us]favourite[/hide_on_us] food? How’s the weather today?, etc.
Play “Vocabulary basketball”
This is a fun game which reviews vocabulary from previous lessons. You will need a basket (a trash can) and 2 balls (or 2 pieces of A4 paper scrunched up into balls).
Form 2 teams and line them up so that two players from each team are facing the front with the basket in front of them. Let both players throw their ball – if they get their ball into the basket they can try and win a point by giving the correct answer to a question the teacher asks. This can be an actual question (e.g. What are you wearing?) or a flashcard (What’s this?). Then they go to the back of the line. At the end, the team with the most points is the winner!
Play “What’s missing?”
This is a fun review memory game – students will have to try to remember review objects from previous lessons (e.g. classroom stationery). Lay the objects out on a table for all to see. Allow the students a minute to memorize the positions of the objects. Remove an object and hold it behind your back. Say, “Open your eyes!” – the first student who can shout out the missing object wins a point for his/her team. Play for all the objects.
Finally, calculate which team has won the most points and give them a round of applause.

Play “Quiz game show”
This is a fun quiz game, like a simple version of a TV game show. Draw some circles on the board and randomly write numbers 1, 2 or 3 in each circle. These will be points.
Put students into teams. Then ask the first team to choose a number – 1 is an easy question (e.g. “Do you like bananas?”) and 3 is a difficult question (e.g. point at a clock and ask, “What time is it?”). 2 will be in between in terms of difficulty. When the question has been answered correctly, erase that number circle. Play until all the number circles are gone – the team with the most points is the winner!
Read a classroom reader again
As you progress through the lessons you will start to build up a catalog of classroom readers (see our Readers download page at https://www.eslkidstuff.com). Kids love going back to old stories and reading through them again. Invite a student to pick a classroom reader and read through it as a class. Make the story as interactive as possible by asking questions (e.g. what [hide_on_uk]colors[/hide_on_uk][hide_on_us]colours[/hide_on_us] there are, the names of different objects, etc.) and getting students to speculate what is going to happen next in the story.

Talk about the weather (do after you have taught the weather lesson plan).
- Prepare a weather board. Before the first class prepare a piece of cardboard and cover it with felt – you are going to pin this to the wall. If you can, try and get blue felt (to represent the sky). Write at the top in large letters, “How’s the weather today?”. Below that write “Today it’s”. Cut out weather pictures (such as our weather flashcards) and stick some velcro on the back. Arrange the weather pictures around the edge of the board and then put the board on the wall of your classroom. You can now use this weather board at the beginning of every lesson.
- Ask about the weather. Ask, “How’s the weather today?” and have students put up their hands. Allow one weather condition per student (e.g. “It’s rainy”) and have each student come up and put a weather picture on the weather board.
- Introduce more weather vocabulary. Depending on weather conditions, you can introduce more weather words (with pictures … you can get students to draw them), such as:
- stormy
- misty
- showery
- freezing
- humid
- frosty
- icy
- drizzly
New learning and practice:
1. Introduce the vocabulary: the four seasons
Before class prepare four pieces of paper with the following words written on each piece:
- Draw a tree. Draw flowers in the tree. Draw a sun and clouds in the sky.
- Draw a tree. Draw lots of leaves in the tree. Draw a big sun in the sky.
- Draw a tree. Draw some leaves in the tree. Draw leaves falling off the tree. Draw leaves on the ground. Draw clouds in the sky.
- Draw a tree with no leaves. Draw snow on the ground. Draw a cloud in the sky with snow falling.

Four students are going to read these and draw the pictures on the board. Alternatively, whisper the instructions into your students’ ears or show them flashcards to copy.
In class, draw 4 large squares in the board. Invite a volunteer student to come up to the board and draw the first picture inside the first of the 4 squares. As the student is drawing, get the other students to guess what is in the picture (e.g. “What’s this?”, “It’s a tree”). Do the same with other students for the remaining three pictures.
Once all 4 pictures have been drawn, point at the first picture and ask, “When does the tree look like this?”. Elicit / Teach “Spring” and write the word under the picture. Do the same for all for pictures and chorus each season word 4 times.

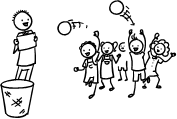
2. Play “Seasons word association draw”
Divide the class into teams (of 3 or 4 students). Give each team one pen and lots small pieces of [hide_on_uk]colored[/hide_on_uk][hide_on_us]coloured[/hide_on_us] paper (e.g. Team A has only red paper, Team B has only blue paper, etc.). This is very important as you will be giving scores to each team based on the amount of pictures they have drawn.
Next, put 4 boxes in the 4 corners of your classroom. Each box should be labelled with a season (e.g. one box will have “Spring” written on it, another “Summer”, etc.).
Now model the activity: take one piece of paper and draw an ice cream. Elicit the word and then ask, “Where should I put this?” and gesture towards the 4 boxes. After receiving a reply for summer, go to the summer box and drop the paper in it. Next do the same for spring (a flower), autumn (a pumpkin) and winter (a woolly hat).
Finally drop a prize into each box (e.g. some [hide_on_uk]candies[/hide_on_uk][hide_on_us]sweets[/hide_on_us] or stickers, etc.) and explain that the team with the most (correct) pictures in each box will win the prize. Place a timer in view of everyone and set 5 minutes. Then say, “Go!”.
As each team has only one pen they will have to work together to come up with ideas and draw them. Then one player will have to rush to a box and drop the picture into it. Teams will probably find summer and winter easy but may need some prompting from you for spring and autumn. As they are drawing, walk around and ask questions (e.g. What is that?) and elicit / teach vocabulary. Make sure someone draws some key vocabulary from the song that will be sung later in the lesson (a picnic, beach, snow).
When the timer goes off get everyone to stop. You are going to count the number of papers each team has in each box – but you are going to be really strict! Throw out any badly drawn pictures which you can’t guess what they are and any pictures that are wrong or are not season specific. Elicit what each picture is when you hold it up. Count the scores and write them on the board. Then tell the class that they have an additional 5 minutes to finish but must not draw any pictures that other teams have drawn. Set the timer for a further 5 minutes and start.
When the timer goes off, be strict again about which pictures earn points and finally give out the prizes to the teams with the most points.
3. Do “Season objects writing” activity
Your students are going to write the words for the pictures they have just drawn, so this is a great activity if your students are at a high enough level to write words (even with spelling mistakes). If not (for younger students), skip this activity and go on to point 4. Take the boxes with pictures inside and give the pictures out randomly to each group. Model by holding up one of the pictures (e.g. a flower) and elicit the word. Then turn over the piece of paper and write “flower” on the back.

Give a time limit (say 5 minutes) and get each group to write words on the back of as many pictures as they can, using the one pen (again, so they will have to work as a team). If a team does not know the word, they can send one person up to the teacher with the picture to ask what it is – but the teacher will only say the word and will refuse to spell it – the students will have to try their best to spell each word.
When the timer goes off, tell everyone to stop writing. On the board draw two intersecting lines so the board is divided into four equal squares. Write a season in each of the squares. Go around the class asking for the words they have written and write the words on the board – for each correct spelling the team wins a point (also, make sure they correct their spelling mistakes on the back of the pictures). At the end total up the points and award a prize to the winning team.
4. Play “Seasons bingo”
Keep the same groups together and the pictures that they have drawn. Get each team to deal out the pictures so that each student is holding the same number of pictures. The class is going to play “Seasons bingo” with the pictures.
The teacher says a season and a word (e.g. “summer – ice cream”) and any students holding that picture can put it in the middle of their table. Keep going until one student has discarded his/her last card and shouted “Bingo!”. Play a few rounds for fun.

5. Sing “The seasons song”
Before class, print off the song poster for The seasons song. Put the song poster on the board and elicit the seasons and the activities on it. Then get everyone to stand up and follow you doing the actions and singing (as described below in Gestures). Play the song through 2 or 3 times.
Lyrics for “The seasons song”
Chorus:
Spring, Summer, Autumn, Winter.
Spring, Summer, Autumn, Winter.
Verse 1:
In the spring, in the spring,
It’s nice and warm, nice and warm,
In the spring, in the spring,
It’s nice and warm, nice and warm,
Let’s go for a picnic!
Chorus
Verse 2:
In the summer, in the summer,
It’s very hot, very hot,
In the summer, in the summer,
It’s very hot, very hot,
Let’s go to the beach!
Chorus
Verse 3:
In the autumn, in the autumn,
It’s nice and cool, nice and cool,
In the autumn, in the autumn,
It’s nice and cool, nice and cool,
Let’s go for a walk!
Chorus
Verse 4:
In the winter, in the winter,
It’s really cold, really cold,
In the winter, in the winter,
It’s really cold, really cold,
Let’s play with the snow!
Gestures for “The seasons song”
We’ll use some fun gestures with this song:
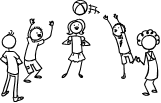
– during the chorus do the following gestures, standing with legs apart (see picture):
- “Spring” – hands up at 12 o’clock
- “Summer” – hands out at 3 o’clock and 9 o’clock
- “Autumn” – hands straight down at 6 o’clock
- “Winter” – hands out at 3 o’clock and 9 o’clock
– during the verses do the following gestures:
- “In the spring / summer / autumn / winter …” – hands out, waving in time with the music
- (Spring) “It’s nice and warm” – hug yourself looking warm and happy
- (Spring) “Let’s go for a picnic” – gesture eating delicious food
- (Summer) “It’s very hot” – fan your face looking hot and bothered
- (Summer) “Let’s go to the beach” – gesture swimming
- (Autumn) “It’s nice and cool” – wipe your forehead looking like you have cooled down
- (Autumn) “Let’s go for a walk” – gesture walking
- (Winter) “It’s really cold” – shiver and look cold
- (Winter) “Let’s play with the snow” – gesture patting a snowball into shape and throwing it
[hide_on_uk]Short sample (members get full-length song):
[/hide_on_uk]
[hide_on_us]Short sample (members get full-length song):
[/hide_on_us]
6. Read classroom reader
Let’s follow the song with a reader which uses vocabulary from the song. We have 2 different classroom readers for you to choose from:
- Four seasons (better for lower levels / younger students)
- Silly Willy’s seasons (better for higher levels / older students)
Four seasons (better for lower levels / younger students):
Before class, download and print off the reader “Four seasons” from our website. As you go through each page, point to the pictures and elicit the seasons and climates and also ask what activity we can do, for example:
Teacher: (pointing at the picture on page 1) Look at the girl. What’s this with the girl (pointing at the dog)?
Students: A dog!
Teacher: Yes, it’s her pet dog! Hello! So, what season do you think it is?
Students: Spring!
Teacher: Yes, good job, it’s spring! And is it cold in spring?
Students: No, it’s warm.
Teacher: Ok, let’s check (reading on page 1) “It’s spring. It’s nice and warm”. Well done! (Reading again) “What shall we do?”. Well, it’s nice and warm. What do you think they should do in spring?
Students: Go for a picnic!
Teacher: Let’s see (turning the page and reading) “Let’s go for a picnic!”. Yes, that’s right. Look, what are they having for their picnic?
etc.
Get the students really involved in the story by asking lots of questions about the different things in the pictures. When you get to the end, find out which season each student likes best, for example:
Teacher: (reading on pages 9 and 10) “Which season do you like best?”. (Pointing at the seasons pictures) Which season do you like best Miki?
Miki: Um … summer!
Teacher: The summer. Yes, I like summer too. What do you do in summer, Miki?
Students: I go to the beach.
Teacher: Yes, it’s hot in the summer, isn’t it? So the beach is a good place to go. How about you, Tomas? Which season do you like best?
Students: Winter!
etc.
After reading the story, give out a reader worksheet to each student and have everyone match the seasons to the actions. Then go through the answers as a class.
Alternatively, watch our video version of the reader (Internet connection required).
Silly Willy’s seasons (better for lower levels / younger students):
Before class, download and print off the reader “Silly Willy’s seasons” from our website. As you go through each page, point to the pictures and elicit the seasons and talk about what Silly Willy is doing, for example:
Teacher: (pointing at the picture on page 4) Look at Silly Willy! What is he doing?
Students: He’s going for a walk!
Teacher: Yes, that’s right! And how is the weather?
Students: It’s sunny!
Teacher: Yes, good job! And what season do you think it is?
Students: Spring?
Teacher: Ok, let’s check (reading on page 5) “One spring day, Silly Willy went outside. It was warm and sunny. There were lots of flowers and rabbits were playing in the fields.”. Good job, it is spring!
Get the students really involved in the story by asking lots of questions about the weather during different months and activities they do (and don’t do) in their country, for example:
Teacher: (reading on page 5) “What did Silly Willy do? He tried to build a snowman!”. Build a snowman in spring? Do you build snowmen in spring?
Students: No!
Teacher: Of course not. It’s too warm for snow in spring. When do you build snowmen?
Students: In winter!
Teacher: Yes, that’s right. So what do you do in spring?
Students: We go for picnics.
etc.
After reading the story, give out a reader worksheet to each student and have everyone answer the questions. Then go through the answers as a class.
Alternatively, watch our video version of the reader (Internet connection required).
7. Do the “Seasons clock” craft
This is a great craft which you can hang on the classroom walls and update each season or even each month. Before class there are a few things you will need to prepare:
- cut large circles out of construction paper or white cardboard – enough for each group of 3 or 4 students. This will be the base of the season clock.
- for spring, you’ll need different [hide_on_uk]colored[/hide_on_uk][hide_on_us]coloured[/hide_on_us] paper or card: reds, pinks, blues, greens – students will cut into flower shapes (for really little ones you’ll have to cut flower shapes out yourself before class)
- for summer, you’ll need sand or yellow glitter (you can get from craft stores) – students will make a beach scene
- for autumn, you need different [hide_on_uk]colored[/hide_on_uk][hide_on_us]coloured[/hide_on_us] paper or card: dark reds, oranges and browns – students will cut into leaf shapes (for really little ones you’ll have to cut leaf shapes out yourself before class)
- for winter, you’ll need cotton wool / cotton balls – students will make a snow scene with this.
- you’ll also need glue and pens or even paint if you wish
Put the class into groups of 3 or 4 and give out the materials to make the season clocks. Start off by getting everybody to draw 4 lines from the [hide_on_uk]center[/hide_on_uk][hide_on_us]centre[/hide_on_us] of the circle to the outside, so that you create 4 different areas (one for each season). Write the word for each season in each segment. If you have taught months, get everybody to write the months in order around the edge of the clock, with 3 months in each segment (you can just use the first letters of each month), so that it looks like the image below:

Now comes the fun part – everyone is going to get creative and decorate the clock – cutting out flower shapes and gluing onto spring, cutting out leaf shapes and gluing onto autumn, making a beach scene in summer (put glue on the paper and then sprinkle over the sand/glitter to make the beach – use blue [hide_on_uk]colored[/hide_on_uk][hide_on_us]coloured[/hide_on_us] pens or paint for the sea) and gluing cotton wool for snow in winter. Let everyone add extras, e.g. a big sun in summer, seasonal clothing, etc.

When everyone has finished, stick the crafts onto the wall and give each team a pin (or something sticky, like blue-tak) to place in the season (or month) that it is now.
In future lessons you can refer back to the clocks and have your students move the pin as the seasons (and months) change.

8. Play “Find the season pictures”
To end the lesson, we’ll have some fun with the pictures the students drew in point 2. Clear all the desks and chairs to the edge of the room. Collect up all of the pictures and then randomly scatter them around the room. Next, pick the Summer box from point 2, and say, “Ok, everyone. Find all the summer pictures and put them in the box, Ready … Go!”.
Everyone rushes around picking up pictures and placing them in the summer box. Then do the same for the other seasons.
Wrap up:
Assign homework: “Four seasons” worksheet
Click for wrap up suggestions for the end of your lessons
1. Assign homework
Each week give out a homework worksheet for your students to take home. Hold up the homework worksheet and model how to do it. Give out the worksheets and say, “Put your homework in your bags”.
2. Do “Quick check”
Time to leave the class. Make sure everything is put away and the students have gathered their belongings. Have them line up at the door and place yourself between the door and the students. For each student check one new word or phrase, for example:
- hold up an object or flashcard (such as an item of clothing) and ask, “What’s this?”
- ask a question from the lesson (e.g. “Where do you live?”, “Do you like bananas?”, “Can you play chess?”, etc.)
When they give you the correct answer say goodbye and let them leave. If their answer is wrong, have them go back to the end of the line – they will have to try again once they reach the front!
Other lesson plans
Actions, verbs & tenses:
- Can – for ability
- Morning routines
- Daily routines & times of the day
- Actions – Present continuous
- Future plans using “going to”
- Past tense activities – Regular verbs
- Past tense activities – Irregular verbs: Part 1
- Past tense activities – Irregular verbs: Part 2
Adjectives:
- Describing people
- Describing things
- Comparing things (Comparative adjectives)
- Comparing things (Superlative adjectives)
Adverbs:
Alphabet:
Animals:
Body:
Classroom:
Clothes:
Colors:
Colours:
Directions:
Family:
Feelings & emotions:
Food:
Health & sickness:
Holidays & festivals:
Jobs:
Likes, dislikes & favorites:
Likes, dislikes & favourites:
- Likes & dislikes
- [hide_on_uk]Favorites[/hide_on_uk][hide_on_us]Favourites[/hide_on_us] and asking why
Nature & Our world:
Numbers:
Places & where we live:
Prepositions of location:
Pronouns:
Shapes:
Shopping:
Sports:
Time, days, months, seasons:
Toys:
Transport & travel:
Weather: